Photos and Video from Mexicali’s 7.2 Earthquake, and How To Build Your Own Seismograph


The Baja California Earthquake on April 4, 2010 left a fair amount of localized destruction and wide-spread shaken nerves in its wake, but thankfully it was not nearly as devastating as could have been. At 7.2 on the Moment Magnitude Scale (an updated, more precise measurement than the Richter scale for large earthquakes), the quake released more energy than the Loma Prieta earthquake that knocked down many parts of San Francisco and Oakland in 1989.
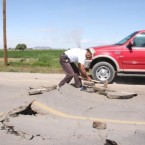
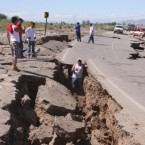
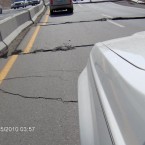
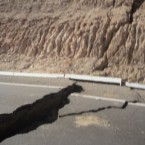
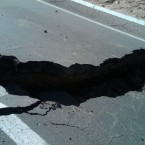
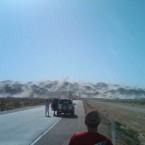
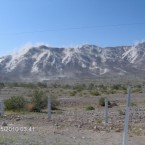
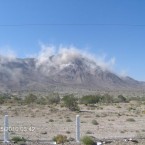
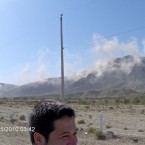
This was a butt-kicking earthquake. It lasted for approximately a minute (compared to 10-15 seconds for Loma Prieta). The power of it can be seen through some phenomenal photos taken during and just after its occurrence – Route 5 heading south of Mexicali has developed massive cracks, and the dust rising off the surrounding mountains show how an earthquake this size treats the surface of the planet like someone trying to shake the sand out of a beach blanket.
Fortunately, the area where the earthquake occurred is not a densely populated metropolitan zone such as San Francisco or Los Angeles. Mexicali and its surroundings are largely agricultural, with a desert that stretches far beyond. The principal buildings are low-rise, and there is no major transportation/freeway network in the area; disruptions will be quickly re-routed. Incidentally, every time I’ve passed through the city I’ve managed to get completely lost, and once even had an early-morning police escort to the border. But that’s unrelated 😉
Here’s how seismometers work, and how to build one of your own:
Earthquakes are measured by seismometers (or seismographs, if the instrument includes the ability to graph the strength of the earthquake.) The main component is an internal weight that is suspended by a spring system, or electronically on modern units. The mass of the weight keeps it in a steady position while vibration or shaking moves its casing. A sensor connected to the unit detects this motion (magnetically, optically or electrically) and sends a signal to an amplifier and processor that translates the motion into interpretable signals.
Professional seismometers are highly sensitive, measuring movement in three directions (north/south, east/west, and vertical), and carefully mounted on bedrock in locations that are resistant to temperature, weather, tidal and humidity effects.
=================
The simplest way to play with a rudimentary seismograph is to install Seismac onto a MacBook or MacBook Pro laptop. The software accesses the built-in sudden motion sensors (designed to protect the hard drive in case of a fall), displaying an X-Y-Z graph. The sensitivity is quite impressive – placed on a cement floor, you can jump up and down a few feet away and observe the vibration it causes. I used this software a bit on the Catch It Keep It TV show to check the amount of ground movement caused by the explosions in our “Pyramid of Beer” episode.

=================
Amazon sells a very simple seismograph model that uses the same basic principles that more advanced units work on. Good for classroom demonstrations on how these units operate: SciEd Seismograph Model

=================
A more advanced and sensitive seismometer unit is the AS-1. Developed by Jeff Batten, aka Amateur Seismologist. You can buy a pre-built unit from Jeff through his website (around $675), or build your own using easy to find materials as many have done. Pretty much everything you need to build the unit can be found at Lowes Hardware.
The AS-1 is a well-regarded unit that is used by scores of amateur seismologists and in many classrooms around the globe. Because of this, there is an incredible amount of information available on its construction, calibration, and use. One good place to start is the IRIS site. “IRIS is a consortium of over 100 US universities dedicated to the operation of science facilities for the acquisition, management, and distribution of seismological data.” This organization and the network of home-run DIY seismographs provides a useful element to compiling and understanding earthquakes.
The AS-1 unit works by suspending a magnet over a sensing coil. Any magnet movement (ground shake) imparts an electrical signal that is amplified and processed (similar in principle to how the strings of an electric guitar interact with the pickups and amplifier). The magnet is affixed to a hinged arm that is held steady with a spring that is tuned to give it a slower frequency, which helps eliminate minor vibrations.
The oscillations of the unit are dampened by an oil-filled unit that acts like the hydraulic shock absorbers on a car. By forcing a branch of the arm to push itself through a resistive path, the spring’s tendency to continue vibrating is diminished greatly. A magnetic dampener is also an option, as seen on Mckimzey’s unit (he also has many useful photos in his writeup).
Here is a series of videos on the assembly and setup of the AS-1 unit. These will assist greatly in putting your unit together.
And a few diagrams and photos to help with assembly as well:
(Make sure to check Dewayne Hill’s, John Lahr’s, and Mckimzey’s pages for more photos and info):


If you want to get technical with it, the preamplifier can be home-built using the schematics found on Andy Loomis’ site.
A list of details on setting up the completed unit are available from San Diego State University’s AS1 page.
Another option to the AS-1 is following the instructions on Infiltec’s How To Build a Low-Cost Seismograph site. A lot of good information on here about the electronics, which can be the trickiest part. They make a kit to assemble for this. Cool stuff.
The final piece is the software that allows you to record and chart the seismic activity your unit is now measuring. A widely used freeware is available called AmaSeis, developed through the IRIS organization. A very useful PDF for setting up the AS-1 and AmaSeis can be downloaded here.

Hi, I'm Mike. I’m the executive editor of Make: magazine, and host of Discovery channel’s Punkin' Chunkin' and Catch It Keep It, TV shows where I build and explain crazy machines that crush stuff, blow things up, shoot fire, all in the name of science.
I've previously worked at Wired and ReadyMade magazines, writing about how to utilize new technology in our everyday lives.
This site is where I keep a list of instructions for fun projects I've done, am working on, or draw inspiration from. I encourage everyone to get involved — get up and do something!